GnuCash allows transaction data to be exported in CSV format with the
optional use of alternative column separators. Transactions can be exported in either a single
line format (simple layout) which can only be used for transactions with two splits and may
not allow all the data associated with a transaction to be exported or in a multiline format
where two or more lines are used for transactions with two or more splits with each splits
information on separate lines. Transaction data can be exported either from the currently
selected active register or from selected accounts. The menu commands to export transactions
are:
->->;
->->.
These commands start the wizard illustrated in to setup the export. They differ only in that in the latter case the Account Selection step is not available in the left hand pane.
The Export transaction wizard opens at the first step and performs the steps listed in the left hand pane:
Choose Export Settings;
Account Selection;
Choose File Name for export;
Export Now...;
Export Summary.
Navigation between the steps uses the buttons displayed in the right hand lower corner of the wizard. Which of the following buttons are displayed will depend on what is permissible from the step:
Cancel: Exit the wizard without exporting any transactions;
Back: Return to the previous step in the wizard;
Next: Proceed to the next step.
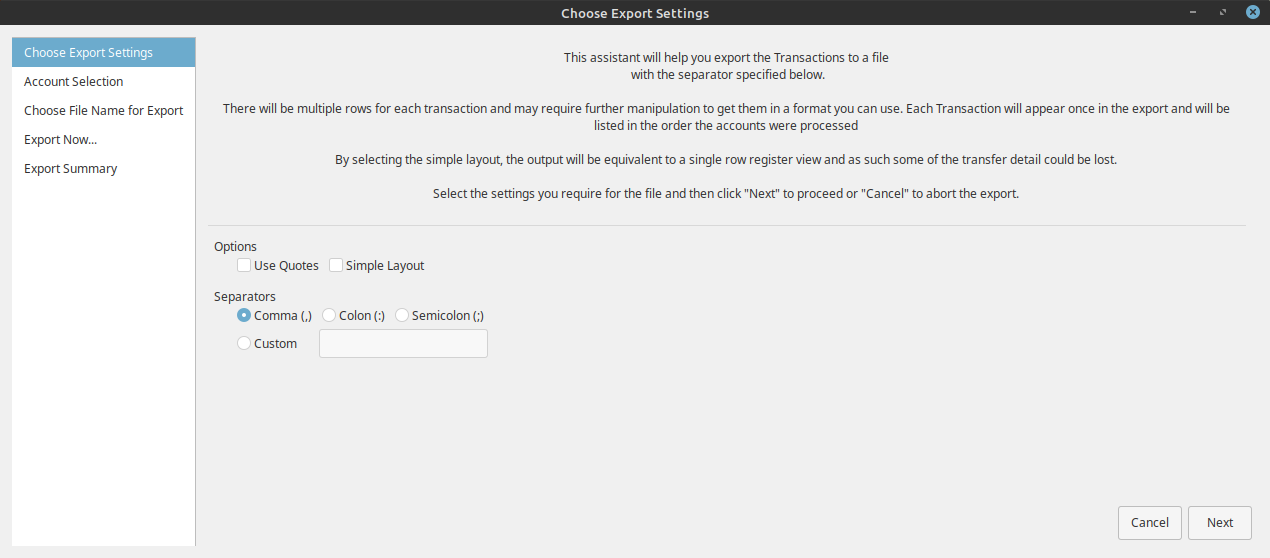
This step allows you to choose various options in the formattig of the transactions being exported.
The Options checkboxes may be selected singly or both may be selected together:
Quotes: Surround each data field in quotes;
Simple layout: If checked, the ouput transaction data will be as displayed in the single row register view option and some of the transfer detail may be lost.
The column headers for data exported in Simple layout format are:
Date
Account Name: name of the source account;
Number
Description
Full Category Path: full account name for transfer/destination account;
Reconcile
Amount with Sym
Amount NUm
Rate/Price
If Simple layout is not checked the transaction data will be exported in a multi-line format.
The column headers for a multiline output for a transaction are:
Date: first line only;
Transaction ID: first line only;
Number: first line only;
Description: first line only
Notes: first line only;
Commodity/Currency: first line only;
Void Reason: first line only;
Action: first line and subsequent lines;
Memo: first line and subsequent lines;
Full Account Name: first line and subsequent lines;
Account Name: first line and subsequent lines;
Amount with SYm: first line and subsequent lines;
Amount Num: first line and subsequent lines;
Reconcile: first line and subsequent lines;
Reconcile Date: first line and subsequent lines;
Rate/Price: first line and subsequent lines;
Each line contains the data relevant to a single split with the first line also having transaction data relevant to all splits in the first 7 columns.
The Separators radio buttons allow the choice of an alternative column separator:
Comma(,): This is the default separator;
Colon(:): Use a colon to separate the columns;
Semicolon(;): Use a semicolon to separate the columns;
Custom: Define a custom character to separate the columns by entering it in the textbox.
Button1 on to go to the next step.
This step allows selection of one or more accounts and the specification of the date range containing the transactions to be exported.
The Accounts panel displays an account tree which allows one or more accounts to be selected for export. ( Ctrl-Button1> and Shift-Button1 may be used to select accounts). The button will select all subaccounts of a selected account. The button will select all accounts in the account tree for export. The number of accounts which have been selected is indicated.
The Dates panel allows selection of either all transactions or only those within a selected date range in the selected accounts to be exported.
A file selection dialog is presented allowing specification of a file name and a path to the directory/folder in which it is to be stored.
The filename and path of the file to be exported and the number of accounts to be exported is displayed. To continue with the export Button1 the button.