- Table of Contents
- Introduction
Introduction
The Account Register is probably the window you will see most often in GnuCash. It is used to enter your financial transactions into GnuCash and also print reports, checks and invoices. The Account Register has three modes to enter transactions and is flexible in its configuration so you can display the transactions in a way that suits you. In this section we will describe its features and configuration and how to enter transactions.
Basic Ledger Transactions
Basic Ledger Mode is the default when you open the Account Register window or when you select Register-> Style->Basic Ledger.

When you first open the Account Register window the cursor will be in the date field ready for you to enter a transaction. All you need to do is tab to the next field and enter the details of the transaction. If you have a number, such as a check number, enter that in the next field then tab again and enter a description of the transaction. The Transfer field is where the double entry nature of GnuCash comes into play as here you will assign the second part of the transaction to another account. If you click on the right end of the Transfer field an arrow box will appear that you can use to select a drop-down menu of accounts to assign the transaction to. As in the example below select the account to assign the transaction to then fill in the amount. When you press the enter key or click the enter icon the transaction is added to the register and the entry field automatically moves to the next transaction.
There are additional fields to the transactions that are accessed by selecting Register-> Style->Double Line. These fields let you add notes to your transactions and select the type of transaction that you are entering. Any of these fields are editable after you enter the transaction. The other half of the transaction is automatically updated with the changed information.
Auto-Split Ledger Transactions
Auto-Split Ledger Mode is selected by Register ->Style->Auto-Split Ledger . This mode lets you see both sides of the transactions you are entering as well as split any part of the transaction into several accounts. Below you see that we have split the previous transaction into two to accurately reflect what the money was used for. The parts of the split automatically disappear when you move to the next transaction and you will just see -- Split Transaction --

Transaction Journal
Transaction Journal Mode is selected by Register ->Style->Transaction Journal . This mode lets you see both sides of all transactions you have entered and the splits of those transactions. When you enter transactions in this mode the previous transactions do not have their parts hidden from view.
Sort Order
The Sort Order for your transactions is selected by Register->Sort Order. The default sort order is to sort by Date. Other sorting options are: date of entry, statement date, Num, Amount, Memo and Description.
Date Range
GnuCash has the ability to show a selection of transactions with Date Range. This is accessed throughRegister ->Date Range->Set Range... . Choose the range of dates you want to display by selecting the Start date: and the End date: and then click Set Date Range to apply the date range. When you need to reset the display back to all the transactions click Register-> Date Range->Show All.
The General Ledger
The general ledger is a special register which contains entries for more than one, account. You can get a general ledger for an account and its subaccounts by using the Open subaccounts menu item on an account window, or a general ledger for every account by selecting General Ledger in the Tools main menu item.
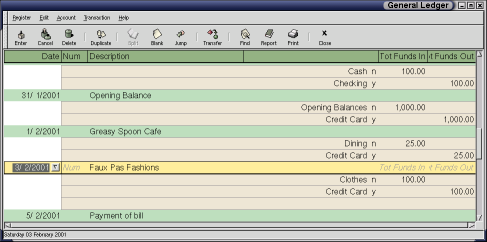
General ledgers show the ledger entries in all the accounts a transaction appears in, which you can edit directly. Note that the general ledger window is more complicated and harder to use than the individual account registers. The general ledger window allows a more comprehensive overview of accounts in a smaller and quicker-to-navigate (for experienced users who know exactly what they are doing) space. Because of its increased complexity, it use is recommended only for accounting experts.