Imported transactions will generally be to a specific account in your account tree. In the following this will be referred to as the import or base account. It may or may not be specified in the data being imported depending on the import format. It is usually the first split of a transaction being imported.
All transactions will also need to have a destination account for
any other splits associated with the tansaction. These may or may not be supplied in the
imported data, depending upon the data source and the format of the data. If it is not,
GnuCash may be able to assign an account on the basis of the
previous import history by matching infomation in the imported data to data associated with
previous account assignments in the importer. The user may always over-ride this automatic
assignment or where no assignment can be made automatically assign an account manually.
Multi-split data exported from GnuCash in CSV format will normally have
both the import and destination accountsfor transaction splits specified in the data file.
GnuCash allows transactions to be imported in a number of structured
formats for the exchange of financial data as well as in the unstructured CSV format, a
plain text tabular format commonly used for the import and export of data to and from
spreadsheets:
QIF (.qif) Quicken Interchange format - import data from Quicken financial software;
OFX/QFX (.ofx,.qfx) Open Financial eXchange format (QXF is an Intuit/Quicken proprietary version of OFX);
CSV (.csv) Comma Separated Values;
Others Import with AQBanking supports importing several European and International file formats including:
CAMT 052Daily Bank Statements
OLYMPIC Banking System ERI
Spanish Q45
SWIFT MT535, MT940, MT942.Bank Statements
Swiss YellowNet XML
 | Note |
|---|---|
Files using these formats do not necessarily use the file extensions shown above. | |
These import methods can be accessed from the → sub-menu entry, along with methods for importing other types of data. Select the appropriate entry from the → sub-menu to initiate importing transactions.
User preferences set in the Import tab or the Online Banking tab of the user preferences accessed by → from the menu will affect the importing of transactions from the files described below.
To import data from Quicken®, MS Money®, or other programs that use QIF(Quicken® Interchange Format), you must first export your data to a QIF file. One way to do this is to export each account as a separate QIF file. An easier way, available in Quicken® 98 and beyond, is to export all accounts at once into a single QIF file. Check your program's manual to determine if this option is available.
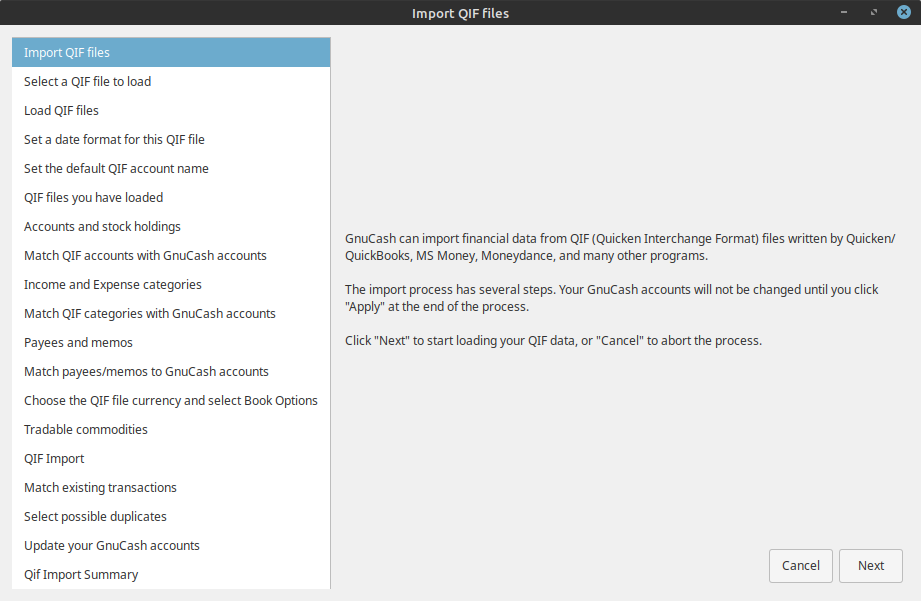
Select → → from the menu to open the QIF Import dialog box illustrated below.
Dialog Navigation. The right hand pane will display some or all of the following navigation buttons:
: Exit the dialog;
: Go back to the previous step;
: Proceed to the next step.
The buttons displayed are determined by whether navigation to the destination step is valid from the current step.
Import Dialog Steps. The left hand pane lists the steps in the import dialog process. The right hand pane contains instructions and/or controls for performing the operations in the step selected and highlighted in the left hand pane. The import process steps are:
Import of QIF files: Initial informational panel. Click to proceed;
Select a QIF file to load: Open a file selection dialog. Navigate to and select the file you wish to import and click . Then click ;
Load QIF files: Click the button to load the file. The file will be parsed and loaded. If errors or warnings occur you may have to remove the file, edit it and reimport it. If there are no errors click ;
Set a date format for the file: Select a date format (m-d-y or d-m-y) appropriate to the locale of the source of your QIF file. In the US this is generally m-d-y and in Europe d-m-y;
Set the default QIF account name: If the QIF file does not specify an account name, enter an account name. If importing data from another accounting program you should use the name used in that program;
QIF files you have loaded: This step allows you to edit the list of files to be imported and to load additional files. To remove a file, click on the row and then click on . To load another file click the . When you have all the files you wish to import loaded, click ;
Accounts and stock holdings: Information panel. Click to proceed;
Match QIF accounts with GnuCash accounts: QIF account names are matched to
GnuCashaccounts if possible. NewGnuCashaccounts are created if no matching accounts are found. For stock, the required account structures are also created. Created accounts are indicated by checking the checkbox in the New column. Assigned accounts may be edited by selecting the appropriate the row and clicking on the button to to run the account selection dialog;Income and Expense categories: Information panel. Click to proceed;
Match QIF categories to GnuCash accounts: QIF categories are matched to
GnuCashaccounts where possible. NewGnuCashaccounts are created where no matchingGnuCashaccount is found. Created accounts are indicated by the checkbox in the New column being checked. If you are not sure what changes are needed, it is safe to accept theGnuCashaccount names. These may be changed later inGnuCash. Assigned accounts may be edited by selecting the appropriate row and clicking on the button to run the account selection dialog;Payees and Memos: Information page. Click to proceed;
Match payees/memos to GnuCash accounts: QIF payees and memos are matched to GnuCash accounts where possible and new accounts are created where this is not possible again indicated by the checkbox in the New column. The assigned account may be changed by selecting a row and clicking on the button to to run the account selection dialog;
Choose the QIF file currency: Select the required currency from the dropdown list and click on to continue;
Tradable commodities: Not yet implemented;
QIF Import: Click on to begin the import.
GnuCashcurrently proceeds to the Update yourGnuCashaccounts tab if the import is successful;Match existing transactions: Not yet implemented;
Select possible duplicates: Not yet implemented;
Update your GnuCash accounts: Click to complete the import. Depending upon the size of your file, the import might take a few minutes to complete, so a progress bar displays the percentage finished. When the import process is complete,
GnuCashwill return you to the main window, which should now display the names of the accounts you imported.Other features are not currently implemented;
QIF Import Summary: Click on to exit the wizard.
->-> opens a file selection dialog. Navigate to the file you wish to import, select a file with the appropriate extension (.ofx or .qfx), then press the button.
GnuCash then opens an Account Selection dialog to select an account in
your CoA to match to an account name in the import file. Select the appropriate account from
the account tree and press the
button. On subsequent import of files from the same source account, the mapped
GnuCash account is remembered and the account selection dialog
is not displayed.
The generic import transaction matcher dialog is opened next. See the Import Matcher section (common to both OFX/QFX and CSV import formats) following the Import CSV section to continue the import process.
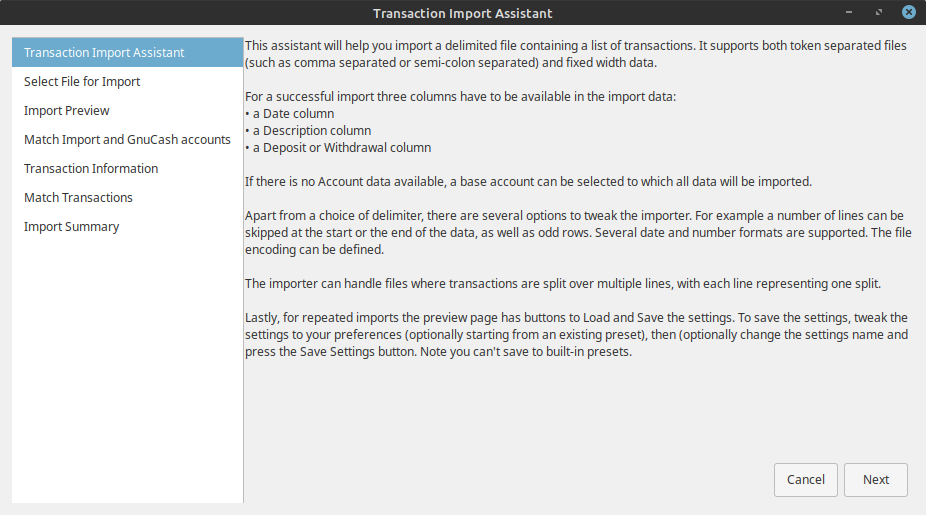
Clicking on ->-> will bring up the CSV Transaction Import Assistant dialog illustrated below.
The CSV Transaction import Assistant is largely self explanatory with information panes which describe the functionality.
Dialog Navigation. Each pane displays a selction of the following navigation buttons at the bottom right:
Exit the CSV Transaction Import Assistant;
Return to the previous step in the assistant;
Proceed to the next step in the assistant.
The buttons displayed are determined by the validity of the traget step from the current step.
Procedure 6.1. CSV Import Process Steps
The steps in the CSV import process are listed in the left hand pane with the current step highlighted. Explanatory text and the widgets to setup and carry out the step are displayed in the right hand pane. The function of the controls in each step is explained below, in the explanatory information in the panes or in tooltips on some controls. The steps in the CSV import process are:
Introductory information panel
Click to continue;
Select File for Import: Display the File selection dialog. Navigate to the file you wish to import then click the button;
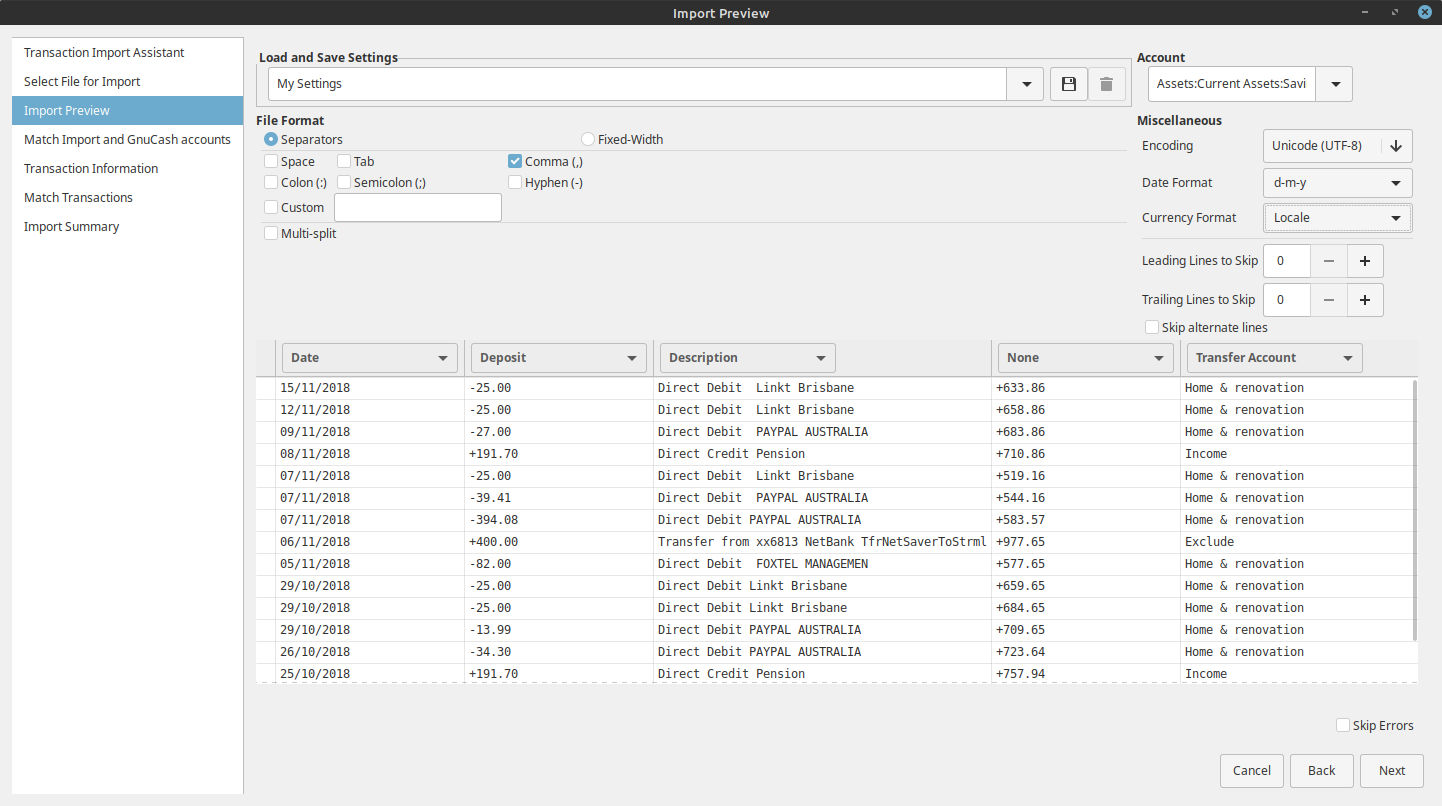
Import Preview: The Import Preview pane controls set options for the import of CSV data and provides a preview of the data to be imported.
Import preview Controls
Load and Save Settings
Abstract
The settings group GnuCash Export Settings defines a setting group for used for the export and reimport of
GnuCashtransaction data - use this if importing data previously exported fromGnuCash.- Save
Once you have set all the import parameters, you can save these settings by typing a unique name in the Load and Save Settings Entry combo box and clicking the Save icon
 just to the right of the box.
- Load
A previously defined settings group can be retrieved by selecting the appropriate setting group name from the dropdown list activated by the down arrow at the right end of the text box. This will set all other settings to the stored values.
- Delete
The Delete/Trashcan icon
 to the right of the Save icon can be used to remove the saved
settings group selected from the drop down list for the box.
to the right of the Save icon can be used to remove the saved
settings group selected from the drop down list for the box.
Account: If the data you are importing does not specify the source account for the transaction an account can be selected from the drop down list will import all transactions to the selected account. Leave blank if your imported data specifies a source account;
File Format:
Character-separated: Selecting this radio button will allow you to define characters which will be used to distinguish columns in the input file. The default is comma separated. In countries using the comma as decimal separator the semicolon is common as column separator. However spaces, tabs, colons or semicolons or any combination of them may be used to separate columns in the input file by selecting the appropriate check boxes. You may also define custom separators by typing the required characters into the text box and selecting the Custom checkbox. This may be used in combination with any of the predefined separators;
Fixed-Width: Selecting this radio button will allow you to define column boundaries by double clicking at the appropriate positions in the sample records displayed in the panel below. Single clicking in a column will narrow, widen or merge the column.
Multi-split: Selecting this check box allows the splits for a single transaction to be defined on consecutive lines within the file with each line defining a single split. If not selected each line is assumed to contain the information for a single transaction including one or two splits;
Multi-split is a gnucash specific variant of a csv file to support easier data preparation.
Each line should define one split by
- transaction-specific fields
date and description as bare minimum and
- split specific fields
account and deposit/withdrawal as bare minimum.

Tip There is a convenience feature built-in so you don't have to repeat the transaction fields if the split belongs to the same transaction as the previous one (though you can repeat them if that makes csv preparation easier).
Example 6.1. Sample Multi-split.csv
Date,Description,Deposit,Account
05/03/2006,Grocery Store,-45.21,Assets:Checking
,,45.21,Expenses:Groceries
14/03/2006,Employers R Us,670.00,Assets:Checking
,,180.00,Expenses:Taxes:Federal
,,90.00,Expenses:Taxes:Medicare
,,60.00,Expenses:Taxes:Social Security
,,-1000.00,Income:Salary
Miscellaneous: The miscellaneous settings allow you to set:
Encoding: This is usually UTF-8, but may differ for files from other sources;
Date Format: This does not default to the Locale setting so check it matches the data you are importing;
Currency Format: Select the format of the decimal separator (full stop or comma or other) for the currency if the correct value is not supplied by Locale;
Leading Lines to Skip: Select the number of header lines to skip in the imported file; [4]
Trailing Lines to Skip: Select the number of trailing lines to skip in the import file;[4]
Skip alternate lines: Use to skip every second line in the import file.
to match the settings for the file you are importing. Tooltips may also contain information on the setting and options.
The import panel shows the data being imported as it is interpreted using the settings chosen to define columns and formats. The dropdown lists in the headers for each column of the import allow you to associate a specific column in the imported data with a specific field in the display of a transaction in an account register. At a minimum to import data, columns in the imported data containing the following information must be specified:
Date: of transaction;
Account: into which transaction is to be imported (or alternatively set the base account as above);
Description: of the transaction;
Deposit or Withdrawal: column.
The dropdown list of
GnuCashtransaction data fields which may be associated with a column of the imported data contains the following:None: The column is not assigned to a transaction data field and is not imported;
Date: Ensure the date format in the column matches the Miscellaneous date Format Setting;
Num: Transaction Num field - Use for check numbers etc.;
Description;
Notes;
Transaction Commodity;
Void Reason;
Action;
Account: This header should be matched to a column specifying the source account for a transaction if it is present. Otherwise, set the source account in the Account combo box;
Deposit: Apply this header to a column containing the amount of the transaction. Positive amounts in the column generally represent an increase in the account balance and negative amounts a decrease in the balance (asset accounts: Checking, Savings). In external statements supplied by a bank for a check or savings account, a credit (Cr) is normally an increase in the account balance and a debit (Dr) a decrease in the account balance. In the banks eyes, your savings or checking account is a Liability to them;
If the amount data is in separate columns for debits and credits you will have to apply both this heading and the Withdrawal heading.
Withdrawal: Apply this header to a column with the amount of the transaction where positive amounts in the column represent a decrease in the account balance and negative amounts an increase in the balance (e.g. Liability account: credit card).
Where separate columns are used for debits and credit to the account apply it to the opposite to the column to which Deposits is applied;
Note Some experimentation may be necessary to determine the correct allocation of the Deposit and Withdrawal headings.
Price: The price for commodity transactions and/or transactions involving currency exchange;
Memo: Additional column containing descriptive information relevant to one split of a transaction. If in the first line of a multi-split import it will apply to the source account. In subsequent lines/splits it is applied to the transfer account defined in that line or allocated to it in the matcher;
Reconciled: Apply to a column indicating the reconciliation status of the transaction. This generally only applies to data exported from
GnuCash;Reconcile Date: Apply to a column which specifies the date of reconciliation, generally only for
GnuCashexported data;Transfer Action;
Transfer Account: This header should be applied to a column which specifies the transfer account for the second split of a single line import and/or for subsequent splits in multiline exported transactions;
Transfer Memo: Apply to a column with descriptive information relevant to a split to a transfer account specified by Transfer Account;
Transfer Reconciled: Apply to a column with reconciliation status information relevant to a split to a transfer account specified by Transfer Account;
Transfer Reconcile Date: Apply to a column containing a reconciliation date relevant to a split to a transfer account previously specified in Transfer Account.
The Skip Errors check box will skip trying to import any rows with errors in matching the columns.
When you are happy with all the import settings, save them if you will use the same settings again, then press the button.
Match Import and
GnuCashaccounts: This window allows you to map the accounts identified in the account columns (Account and Transfer Account) with accounts in theGnuCashaccount tree (Account name). Double click on a row to bring up a dialog to select the matchingGnuCashaccount. If you have previously imported transactions to this account and account mappings can be matched automatically, this window will not be displayed. When you have selected a match for all accounts, click on the button;Transaction Information: The Transaction Information panel allows review of data entry settings so far. Clicking Next will perform checks on the data. If there are errors you will be returned to the Import Preview pane to edit the settings. For no errors you proceed to the next step;
Match Transactions: Clicking on Match Transactions will then bring up the main Import Matcher window. The Import Matcher is described in a separate section;
Import Summary:
GnuCashdisplays a summary of the imported data. Click on the to exit the wizard.
 | Caution |
|---|---|
Multi-split imports of multicurrency transactions and commodity transactions are experimental and may currently experience some errors. Please experiment and report any bugs encountered. | |
If GnuCash was built with AqBanking support and you have AqBanking installed on your computer you may
use Import using AQBanking to import files in several formats.
You will first be presented with a dialog box having two lists. The left one lists importer plugins and the right one lists file format profiles available for that importer. In some cases, for example swift, the profiles include specialized formats for particular bank: Continuing the example the swift importer can import both generic MT940 and MT942 statements and those specialized for the Netherlands's AMRO Bank.
Select an importer and a profile from the lists. GnuCash will remember your selection for the next
time you do an import.
Click OK to proceed to the filechooser. Select a file to import and click the Import button to proceed.
GnuCash will process the selected file and map the account description
in the import file onto the selected account and use it for future imports from the same
account. The imported transactions will then be displayed in the
for review.
The Import Matcher checks whether an imported transaction matches an existing transaction already
recorded in GnuCash within a predefined time window (~+_42
days) for the account into which the transactions are being imported. A match probablity
is calculated based on the Date, Amount, Transaction ID's (if present), Check numbers (if
present) and the Description and split Memo fields. Exact matches will generate a high
match probability and flag a transaction as matching an existing transaction and therefore
not to be imported. If there is a lower quality match to an existing transaction, the
imported transaction may be flagged for updating of non-matching information in the
GnuCash record of the matching transaction. These decisions
can be overridden by the user.
If no matching transaction can be identified the transaction will be flagged for import. The matcher will attempt to assign a transfer account based on matches between tokenized information for previously imported transactions stored in lists associated with the transfer accounts which were assigned to them on import.
If a good match is obtained, the transfer account is assigned and the transaction is flagged as ready to import.
If a transfer account cannot be assigned, the transaction will be flagged for import and manual assignment of the transfer account by the user. By default, if no transfer account is assigned, transactions will be assigned to an Imbalance account on import. This is to indicate that they need an appropriate account assigned to them.
The generic import transaction matcher is invoked when transaction data is imported using any of the following import formats:
QIF;
OFX/QXF;
CSV;
MT940;
MT942;
DTAUS.
This window has the following
Controls:
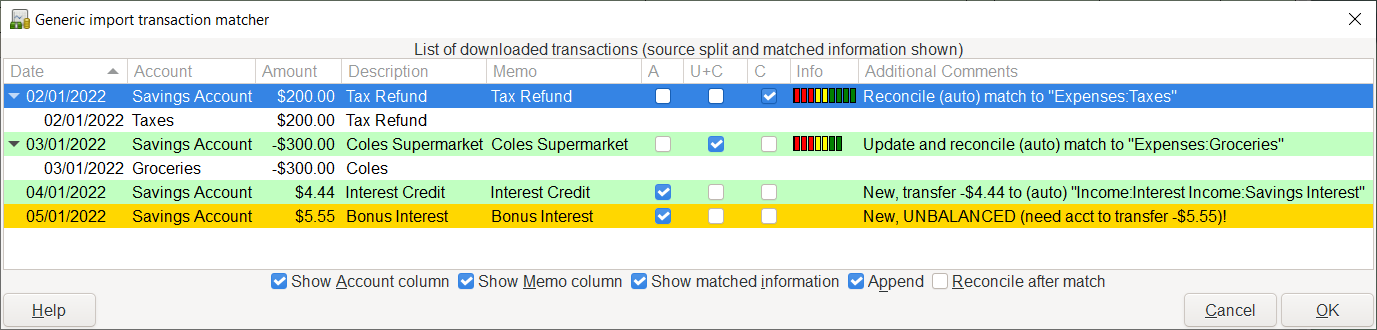
List of downloaded transactions: Table containing information from the imported transactions.
: Checkbox to display the account into which the transactions are being imported. This is the second column labelled Account in the screenshot;
: Checkbox to display the Memo from the imported transactions after the column labelled Description;
: Checkbox to display the matched transaction which has been already imported or entered into
GnuCash. If there is one, this will be a line with a white background (by default) after the imported transaction. This is either the manually selected match if one has been selected or the best possible match otherwise;: Checkbox to indicate that when updating and clearing a matched transaction, the imported Description and Notes are to be appended to the matched transaction Description and Notes respectively, rather than overwriting them. When the button is clicked, the state of the checkbox is saved so the next import for that account will automatically default it to the saved state;
: Checkbox to automatically start the reconciliation process after transactions have been matched and imported;
: Display a popup help window;
: Close this window without importing transaction data;
: Close this window importing transaction data;
The List of downloaded transactions has the following columns which display the following information for each of the downloaded transactions:
Columns in “List of Downloaded Transactions”
Date - The date supplied with the downloaded transaction;
Account - The import or base account to which the transactions will be imported (optional see above);
Amount - The amount of the transaction (split to the import or base account);
Description - The description of the transaction;
Memo - The memo for the split to the import or base account of the transaction (optional see above);
A - Add - Checkbox which indicates that the transaction is to be imported as a new transaction;
U+C - Update and Clear - Checkbox which indicates that the transaction matches an existing transaction but has some differences and the existing transaction will be updated with the different information;
C - Clear - Checkbox which indicates that the transaction matches an existing transaction and will not be imported;
Info - For transactions which have been matched to an existing transaction, this column displays a bar indicating the quality of the match;
Additional Comments - Shows what is to happen to the transaction and the transfer account if known;
In addition to the checkboxes, the import status of each transaction is indicated by the background color of the transaction row. The checkbox state, background colors and their meaning are described in Table 6.1, “Import Status of Transactions”.
Table 6.1. Import Status of Transactions
| Checked Box | Background | Meaning |
|---|---|---|
| A | Gold | No matches, flagged for input and no transfer account matched – Import as a new transaction. Intervention required to select a transfer account. |
| Green | No matches detected, flagged for input and a transfer account is matched – Import as a new transaction. Reconciliation status will be set as cleared (c) on import. Intervention is not required. | |
| U+C | Green | Matches an existing transaction but not exactly on date and/or amount – Intervention not required, import and update. Reconciliation status will be set as cleared (c) on import. |
| C | Green | Matches an existing transaction: – Not to be imported. The existing transaction reconciliation status will be as cleared (c) on import. Intervention is not required |
| Brown | Transaction has poor matches and no action was set: – Not to be imported. Intervention required. | |
| Blue | Row is selected |
| Note |
|---|---|
The colors illustrated here are the defaults for | |
You may always intervene manually to
change the import action by selecting another checkbox (or none) and/or
manually assign a different transfer account
after reviewing the matched transactions and accounts and the automatically selected actions.
Multi row selection is enabled for the list of downloaded transactions. The following operations can be performed on the list of downloaded transactions:
Click (see Mouse Buttons) on a row: Select this row (row is displayed with a blue background);
Double-click on a row: If the transactions is flagged for import (see below) this will open an account selection dialog to select a destination/transfer account to be used in the second split of the imported transaction. You may create a new account if necessary in this dialog using the button. If the transaction is flagged as matching an existing transaction either for import or updating, the match picker dialog is opened to allow the matched transactions to be examined and a correct match selected;
Ctrl+Button1 on a row: Add the row to a selection of rows (displayed with a blue background) to which a single destination/transfer account may be applied;
Shift+Button1 on a row: Select all rows between the last selected row and this row and add them to the current selection of rows;
Click in the window: Display a popup menu which when clicked in turn opens a dialog to select a single destination/transfer account which will be applied to all rows currently selected.
 | Important |
|---|---|
It is important to assign a transfer account to each transaction prior to import of the transactions. Otherwise the tokenized information from the imported transaction will not be appended to the list of tokens for an assigned account for use in future matching of transactions to transfer accounts. | |
| Note |
|---|---|
Note that "reconciled" in this context does not mean the same as "reconciled" in the process of reconciling an account to an external statement. The reconciliation status of an imported transaction is set to cleared (c) on import of a new transaction. See Setting the reconcile status (R field) of a transaction for details of the values of reconciliation status. | |
Where a row has been matched to an existing transaction or is to update an existing transaction it will have a DarkSeaGreen background. Double-clicking on the row will bring up the Match Picker dialog which displays detail of the imported. If you, feel the wrong transfer account has been assigned or the matcher has not produced a valid result, you may change the checkbox selection if you disagree with the matcher decisions and you may reassign an assigned transfer account (see below).
Double-clicking on a row marked as New with a DarkSeaGreen1 background and a transfer account assigned to it will bring up the account selection dialog to allow you to choose a different transfer account for the second split.
Double-clicking on a row marked New with no transfer account matched with a Gold background will also bring up the account selection dialog to allow you to assign a suitable transfer account to the transaction.
Select the required row by clicking on it. It is displayed with a Blue background color.
Double clicking on a row will select it and open an Account Selection dialog to allow you to assign a transfer account. Select the desired transfer account in the dialog and click . The dialog has a button which will allow you to create a suitable account if there is no existing account which can be applied as the transfer account.The row background will change to a Green and the assigned destination account will be displayed in the Info column.
or alternatively, click on a row to select it followed by a click to bring up a popup menu then select to display the Account Selection dialog, select the destination account and click the button.
Sometimes you will have several transactions which can have the same destination account.
GnuCash allows you to select multiple transactions and apply
the same destination account to all transactions in the selection.
Rows in a selection are displayed with a Blue background.
Only rows which have the A checkbox checked and either a Green or Gold background colour can be selected for inclusion in a multiple selection. Rows with a Brown background or with the U+C or C checkboxes checked cannot be selected in a multiple selection.
To select rows and add rows to a selection either:
Click on first row and then Ctrl+Button1 on other rows to add to the selection; or
Click on first row and then Shift+Button1 on another row to select all rows between them.
Rubber banding is also enabled so you may also hold and drag over rows to create a selection. To add more rows, Ctrl-Button1 and drag over more rows.
then Button2 to display a popup menu and then select to open the Account Selection dialog. Select the desired destination account (create a new account if necessary) and click the button in the Account Selection dialog.
Once you have assigned destination accounts for all the imported transactions using the above methods (all row backgrounds will be a light green colour), check that the assigned destination acounts are correct and then press the button at the bottom of Figure 6.6, “The Generic Transaction Import Matcher Window”. The transactions selected for import will have their splits added to the selected source and destination accounts.
The tokenized data from the transactions assigned to a given transfer account is stored on exiting from the matcher and is used to match transactions to the appropriate transfer account in future imports.
The Match Picker allows you to review and edit existing GnuCash
transactions which have been matched to a transaction being imported.
Button1
on a row with the C checkbox checked to bring this dialog up.
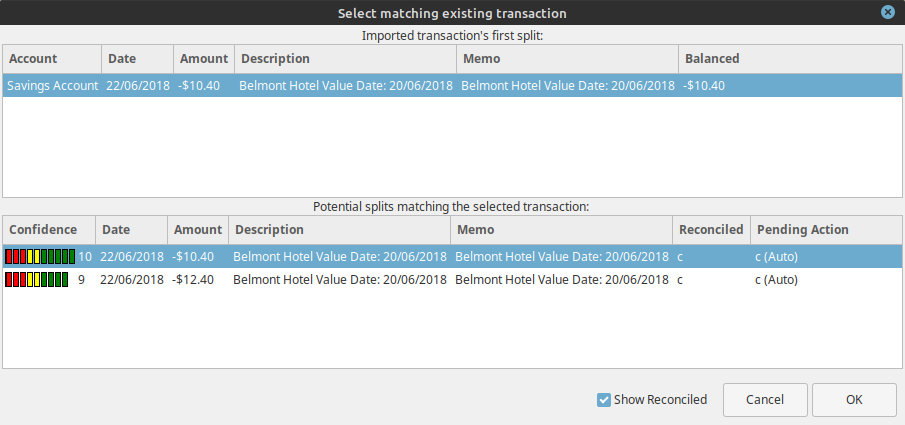
The top pane of the Match Picker displays details of the first split of the transaction to be imported. The column labels:
Account
Date
Amount
Description
Memo
Balanced
are the same and have the same meaning as in Section 6.16.7.3.2, “List of downloaded transactions” with the exception of the Balanced column which gives the amount of the balancing split for the transaction.
The lower pane displays the details of existing GnuCash transactions
which match this transaction. If no transactions are displayed check the
Show Reconciled checkbox at the bottom
of the panel. The first row in this pane will normally be the auto-matched transaction with
the best match score. Other rows will display other existing transactions which might also
be matches for the transaction being imported. The columns in this pane are:
Confidence: This column indicateds the confidence of the individual match as both a bar chart and a numerical value. Where the bar extends into the green, the match is good. If the bar only extend to the red or yellow setions the quality of match is more doubtful.
Date
Amount: If this does not match exactly the amount of the transaction being imported but otherwise the match is good, the amount of the imported transactions is used to update the existing transaction matching it.
Description
Memo
Reconciled: Indicates the reconciliation status of a matching existing transaction.
Pending Action
If you are not happy with the existing transaction that was auto-matched, Button1 on your preferred match to select it and then Button1 the . The transaction will then be marked as a (manual) match in the Info column of the Import Matcher. To exit the dialog without changing the auto-match Button1 on the .
The Import Match Editor allows you to edit the data used by GnuCash to
automatically assign a transfer account in the Import Matcher. It can be used to edit the
data used by the Bayesian matcher, the Non-Bayesian matcher and online ID's. To open it
select -> from the menu.
Figure 6.8. The Import Map Editor
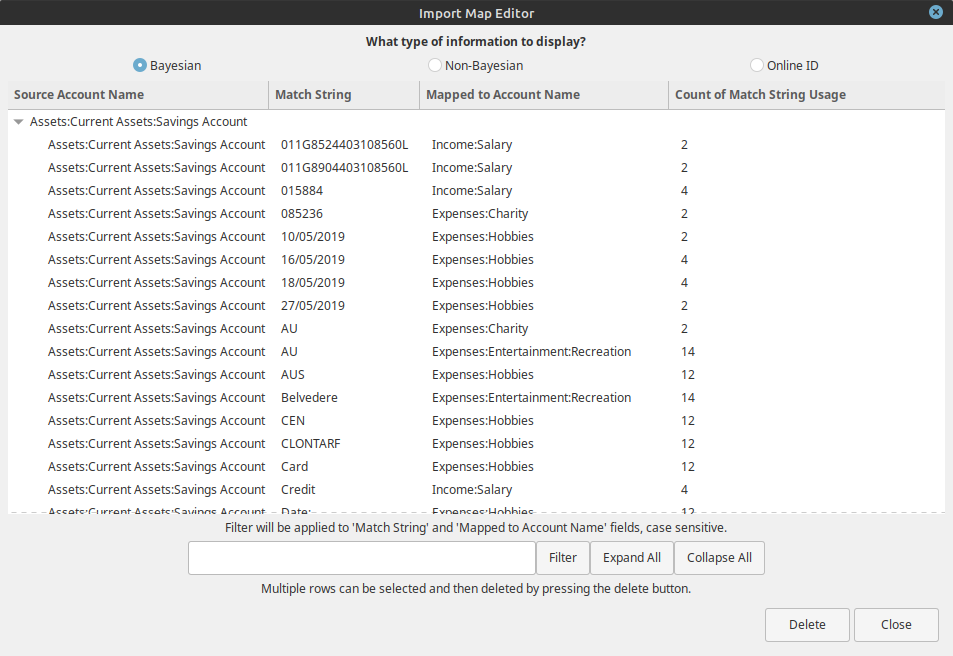 |
The three radio buttons at the top of the dialog select the type of data being displayed and edited:
Bayesian: The Bayesian matcher matches a transfer or destination account using the frequency of association of a token string with an assigned transfer/destination account in the Import matcher for a specific source account (the account that the first split of the imported transactionis directed to);
Non-Bayesian: The Non Bayesian matcher matches the transfer account on the basis of the occurrence of a token string in transactions assigned to a transfer/destination account and does not record the frequency of association. This was the original
GnuCashmatching process and has now been superceeded by the Bayesian matcher in more recent versions;OnlineiD: Online ids are specific strings which identify specific accounts in information downloaded from online sources. they may include account numbers and specific instiution identifiers.
The Bayesian matcher data columns are:
Source Account: This is the account into which a transaction has been imported and is normally the first split in an imported record. It may either be specified in the record itself or during the import setup for all transactions to be imported. The arrow control at the left of each entry in this column may be used to display all the data used in matching a transfer or destination account for transactions which have this account as their source split;
Match String: This column displays a specific token string that has been associated with the allocation of the account in the Mapped to Account Name column as a transfer/destination account for transfers to the Source Account;
Mapped to Account Name: The account name in this column is a
GnuCashaccount name which has been allocated as a transfer/destination account in association with the token string in the Match String column;Count of Match String Usage: This is the number of times the token string in the Match String column has occurred in association with the transfer/destination account specified in the Mapped to Account Name column for transactions imported to
GnuCash.
The Non-Bayesian matcher displays the same first three columns as the Bayesian matcher having the same usage. It does not store data on the frequency with which a particular token is associated with the assignement of a given transfer/destination account. It has an additional column which specifies the type of the imported data process in which the assignment occurred.It has the following columns:
Source Account;
Based on: This identifies the import process in which the Match String was associated with the transfer destination account in the Mapped to Account Name column;
Match String;
Mapped to Account Name.
Online ID displays the same columns with the same data as the Non-Bayesian matcher.
The Filter textbox at the bottom of the dialog allows filtering of the displayed data matching the entered string in either the Match String column or the Mapped to Account Name column.
The and buttons expand or collapse the data in the other columns for the accounts in the Source Account column.
The button will delete any selected rows in the displayed matcher data.
The button closes the Import Match Editor dialog.
[4] While we only want to import transactions, some banks send additional informations like a fieldname header or account status information as header or footer.